Pre-Image vs Post-Image in Dynamics 365 Plug-ins
Understanding Pre-Image and Post-Image in Dynamics 365 Plug-ins
When developing Microsoft Dynamics 365 / Dataverse Plug-ins, we often need more information than simply knowing that a record has been updated.
Sometimes our business logic needs to answer questions such as:
- What was the value before the update?
- What value did the user submit?
- What does the record look like after the operation?
- Has a specific value actually changed?
- Can we get the required data without making another Retrieve request to Dataverse?
This is where Pre-Images and Post-Images become extremely useful.
In this article, we’ll look at what they are, how they differ from the Target, when to use each one, and why they can help us build more efficient Dynamics 365 Plug-ins.
A Simple Scenario
Imagine we have an Account with the following Credit Limit:
Credit Limit = 5,000
A user updates it to:
Credit Limit = 8,000
We want our Plug-in to detect that change and execute some business logic.
At first, this sounds simple.
We can access the Target from the Plug-in Execution Context.
But there is an important problem:
Where do we get the previous value of 5,000?
This is one of the situations where a Pre-Image is useful.
What Is the Target?
Before talking about Images, it’s important to understand the Target.
During an Update operation, Dynamics 365 provides information about the operation through the Plug-in Execution Context.
The Target can normally be accessed through:
context.InputParameters["Target"]
For an Update message, the Target generally contains the attributes that are part of the current update request.
For example, if the user changes only:
Credit Limit → 8,000
the Target may contain the new Credit Limit value, but it should not be treated as a complete snapshot of the entire Account record.
This distinction is extremely important.
A common mistake in Plug-in development is assuming that Target always contains every attribute of the record.
It doesn’t.
What Is a Pre-Image?
A Pre-Image is a snapshot of selected record attributes before the core operation takes place.
In our example:
Before Update:
Credit Limit = 5,000
The Pre-Image can provide that previous value to the Plug-in.
Conceptually:
Pre-Image
Credit Limit = 5,000
while the Target contains:
Target
Credit Limit = 8,000
Now our Plug-in can compare them:
Old Value = 5,000
New Value = 8,000
and determine that the Credit Limit has actually changed.
When Is Pre-Image Useful?
Pre-Images are particularly useful when your business logic depends on the previous state of a record.
Typical scenarios include:
Comparing old and new values
For example:
Old Status = Pending
New Status = Approved
The Plug-in can determine that a specific state transition has occurred.
Detecting meaningful changes
A field appearing in an update request and a meaningful business change are not always the same thing.
Having access to the previous value allows the Plug-in to make better decisions.
Validating a transition
Imagine that an Order should only move from:
Draft → Approved
but not directly from:
Draft → Completed
The previous state becomes essential for enforcing this rule.
Performing calculations based on previous data
Sometimes a calculation requires both the previous and new values.
Without the previous value, additional data retrieval might otherwise be required.
What Is a Post-Image?
A Post-Image is a snapshot of selected attributes after the core operation has taken place.
Returning to our Credit Limit example:
Before:
Credit Limit = 5,000
After:
Credit Limit = 8,000
The Post-Image represents the record state after the operation.
This can be useful when the Plug-in needs to work with the final state of the record, rather than only the fields included in the incoming Target.
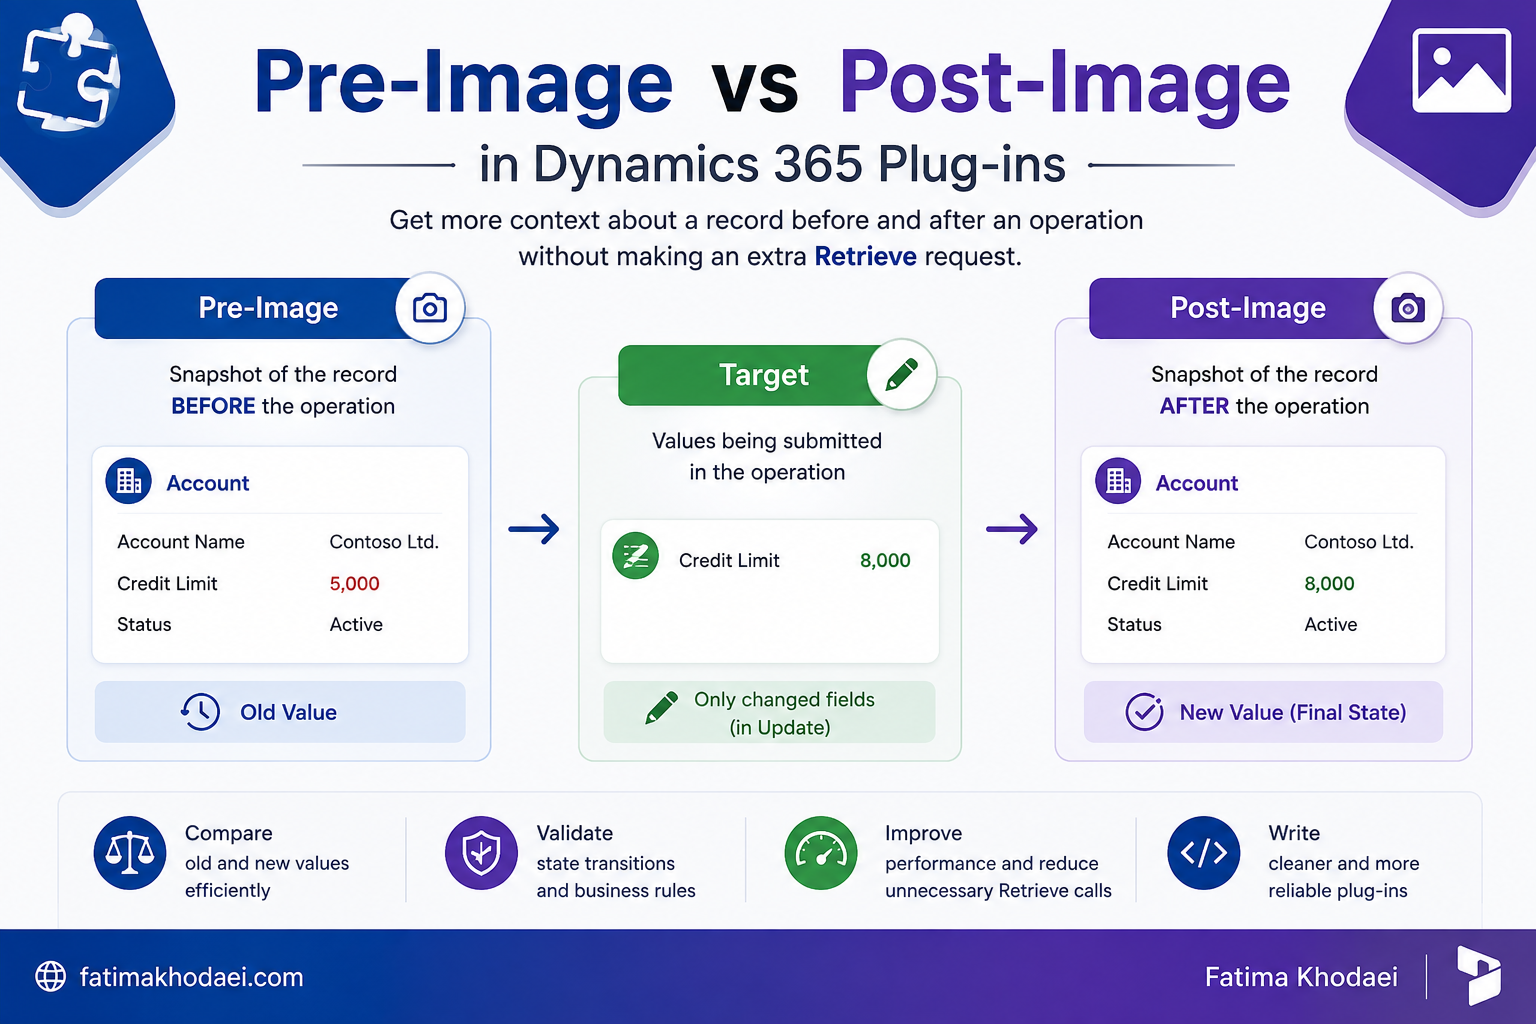
Target vs Pre-Image vs Post-Image
The easiest way to understand the three concepts is:
| Source | What does it represent? |
|---|---|
| Pre-Image | Selected record values before the operation |
| Target | Values supplied as part of the current request |
| Post-Image | Selected record values after the operation |
Using our example:
PRE-IMAGE
Credit Limit = 5,000

       ↓

TARGET
Credit Limit = 8,000

       ↓

POST-IMAGE
Credit Limit = 8,000
This distinction becomes especially important during Update operations.
The Target should not automatically be considered the complete “after” version of the record.
Why Not Just Retrieve the Record?
You might ask:
Why don’t we simply use the Organization Service to retrieve the record whenever we need additional information?
Technically, there are situations where retrieving data is necessary.
However, if the information your Plug-in needs can already be supplied through a properly configured Image, performing another Retrieve introduces an additional request that may be unnecessary.
Instead of:
Plug-in executes
      ↓
Retrieve existing record
      ↓
Process business logic
we may be able to use:
Plug-in executes
      ↓
Read Pre/Post Image
      ↓
Process business logic
This can reduce unnecessary Dataverse calls and keep Plug-in logic cleaner.
The important point is not that Retrieve is always wrong.
It is that we shouldn’t retrieve data unnecessarily when the execution pipeline can already provide the required values.
Configuring Images
Pre-Images and Post-Images are configured when registering the Plug-in Step.
Using the Plug-in Registration Tool, an Image can be associated with the appropriate Plug-in Step.
When configuring an Image, we specify information such as:
- Image type
- Image name / alias
- Attributes that should be included
The alias is important because our Plug-in uses it to access the Image.
For example:
Entity preImage =
    context.PreEntityImages["PreImage"];
The name PreImage must correspond to the alias configured during registration.
Similarly, a Post-Image can be accessed through:
Entity postImage =
    context.PostEntityImages["PostImage"];
Don’t Include Every Column
When configuring an Image, it may be tempting to include every attribute.
Usually, that’s unnecessary.
If your Plug-in only needs:
Credit Limit
Status
Customer Type
then configure the Image with those required attributes.
This makes the Plug-in’s dependencies clearer and avoids carrying data the logic doesn’t need.
A good rule is:
Include the attributes your Plug-in actually needs, not every attribute that exists on the table.
Example: Detecting a Credit Limit Change
Let’s imagine our Plug-in needs to react whenever an Account’s Credit Limit changes.
Conceptually, the logic looks like this:
Pre-Image
      ↓
Read previous Credit Limit

Target
      ↓
Read submitted Credit Limit

Compare
      ↓
Has the value changed?

YES → Execute business logic
NO  → Do nothing
A simplified C# example could look like:
var target = (Entity)context.InputParameters["Target"];

var preImage = context.PreEntityImages["PreImage"];

var oldLimit =
    preImage.GetAttributeValue<Money>("creditlimit");

var newLimit =
    target.GetAttributeValue<Money>("creditlimit");

if (oldLimit?.Value != newLimit?.Value)
{
    // Execute business logic
}
In production code, additional checks should be made to ensure the required parameters, Images, and attributes are available before accessing them.
Pre-Image and Filtering Attributes Work Well Together
There is another useful Plug-in concept related to this scenario: Filtering Attributes.
Suppose our Plug-in only needs to execute when creditlimit is included in an Update request.
Instead of allowing the Plug-in Step to execute for every Account update, we can configure:
Filtering Attribute:
creditlimit
Now we have two complementary concepts:
Filtering Attributes
Determine when the Plug-in Step should execute based on attributes included in the request.
Pre-Image
Provides the previous value needed by the Plug-in logic.
Together they can produce more focused and efficient Plug-in behavior.
Common Mistake #1: Assuming Target Is the Entire Record
Consider an Account containing:
Name
Credit Limit
Industry
Account Manager
Status
If the user only updates Credit Limit, the Target shouldn’t be assumed to contain all those other attributes.
Therefore, code that blindly expects unrelated fields to always exist in Target can fail or behave unexpectedly.
Always think of Target in the context of the current request.
Common Mistake #2: Retrieving Data Without Checking Images
Another common pattern is immediately performing a Retrieve whenever an old value is required.
Before doing that, ask:
Can the required value be provided through a Pre-Image?
If yes, the extra Retrieve may not be necessary.
Common Mistake #3: Registering Too Many Image Attributes
Selecting every attribute may seem convenient during development.
However, explicit configuration is generally easier to understand and maintain.
If a Plug-in needs three fields, configure those three fields.
This also makes it easier for another developer to understand the data dependencies of the Plug-in.
Common Mistake #4: Confusing Post-Image with Target
Target and Post-Image are not simply two names for the same thing.
During an Update:
Target represents the values submitted with the request.
Post-Image represents selected values from the record after the operation.
Understanding this difference prevents many confusing Plug-in bugs.
Which One Should I Use?
A simple decision guide:
I need the value before the operation
Use:
Pre-Image
I need to know what the current request is changing
Check:
Target
I need selected values representing the record after the operation
Use:
Post-Image
I need to compare before and after
Depending on the Plug-in design and pipeline stage, you may use:
Pre-Image + Target
or:
Pre-Image + Post-Image
The right choice depends on what exactly the Plug-in needs to know and when it executes.
Why Images Matter in Real Dynamics 365 Projects
Pre/Post Images may look like a small Plug-in concept, but they represent an important development principle:
Understand the Dynamics 365 execution pipeline before adding additional service calls.
A well-designed Plug-in shouldn’t only “work.”
It should also be:
- Efficient
- Predictable
- Maintainable
- Easy to debug
- Explicit about the data it depends on
Knowing when to use Target, Pre-Image, Post-Image, Filtering Attributes, and Organization Service is part of building better Dynamics 365 Plug-ins.
Final Summary
If you remember only three things from this article, remember these:
Pre-Image → Before
Target → Current request
Post-Image → After
Pre/Post Images allow Plug-ins to work with record state at different points in the execution pipeline and can often eliminate unnecessary data retrieval.
When building an Update Plug-in, ask yourself:
Do I need the previous value?
Do I only need to know what is being changed?
Do I need the final record state?
The answers will usually tell you whether you need a Pre-Image, Target, Post-Image — or a combination of them.
Related topics: Dynamics 365 Plug-ins, Dataverse, Execution Context, Plug-in Pipeline, Filtering Attributes, Plug-in Performance